How to Protect Your Deck
By Dave KileSunshine and dinner hot off the grill. What’s better than time on the deck? To make the most of outdoor living, extend the life of your deck.
Protecting your deck is an essential home improvement task, but it’s not complicated. The three most important steps are to seal the deck, clean the deck, and protect the deck.
How to Maintain a Wooden Deck?
Wood decks can add a lot of value to your home. Not only is it a fantastic way to enjoy the outdoors in your own backyard, but it also adds value to your property and can make your house easier to sell.
However, the condition of wooden decks is beaten down by regular use and unforgiving environmental conditions. Even the best quality wooden decks are susceptible to warping and bending and attract mildew and fungal spores. Nevertheless, wood decks can last significantly longer when you clean your deck correctly, including periodic staining and sealing, pressure washing, and general upkeep.
Decking that is pressure-treated with preservatives lasts much longer than untreated decking, but even pressure-treated decking can deteriorate over time if it is not cared for properly.
Seal Your Deck
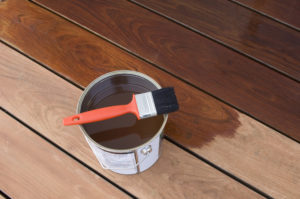 Your wood deck needs extra protection. Along with using Trex Protect flashing tape during construction to cover your beams and joists, you’ll need to care for your decking boards by sealing them regularly.
Deck maintenance is critical because an unprotected deck will rot much more quickly. The best deck sealants coat the fibers, like wax on a car, so your wood can resist moisture.
Even pressure-treated wood will eventually crack and split if repeatedly exposed to water. Without protection, the wood is also prone to fungus growth and ultraviolet light. Use a deck preservative — a deck sealer or stain with clear sealer to cover and protect those top boards. A sealant is usually clear, while stain colors your wood and often gives it a richer look. Deck stain can be semi-translucent or opaque.
Stain and sealant lose their ability to protect, so reapply over time. Depending on how protected your deck is from the elements and the amount of foot traffic it sees, you may have to re-stain or re-seal every year. Some newer products, however, can last longer, up to three or four years.
Here is an easy step-by-step guide to sealing:
- Check the weather to be sure you’ll have temperatures between 50 and 90 °F (10 and 32 °C). The right temperature will ensure the best seal.
- Clean off the deck surface — both furnishings and debris.
- Sand, if needed. Sanding helps ensure the sealer adequately penetrates the wood. Be sure to clean off any sawdust, even between the cracks.
- Stir the sealer. Please do not shake it, as that may cause bubbles in the finish.
- Apply the sealer with a brush, paint roller, or sprayer. Apply a thin coat over a two-to-three-board section. You can always add another thin coat later as it will apply and dry better than one thick coat.
- Repeat and fine-tune. Let it dry. Make sure the deck is completely dry before moving back the furnishings.
Applying Deck Sealer To A Wood Deck
Applying deck sealer is a great way to protect and preserve outdoor wood decks. Deck sealer will protect from water, mildew, dirt, and other sources of wear and tear. There are many brands of deck sealers to choose from, but butyl tapes have been the preferred choice of deck sealers for years.
Butyl tape is a type of rubberized, waterproof tape that is commonly used in construction to seal the seams between boards. The tape is applied to the seam and then pressed into place with a caulking gun, which applies pressure and heat that makes the adhesive stick. Butyl tapes are flexible, durable, water-resistant, adhere well to wet surfaces, and are self-sticking.
Butyl tapes are:
- Easy to install, even for a DIY enthusiast.
- Durable and can withstand water and moisture without getting damaged.
- Safe and don’t produce any kind of toxic fumes while they are being installed, which is an advantage because it means that the installer doesn’t need to wear any protective gear while working with them.
- Flexible and can be used on curved and flat surfaces without causing any damage or curling up at the edges or corners of the deck boards.
- Highly adhesive and will stick to the surface that they are applied to very well and won’t peel off easily when pulled on or tugged at by people walking on them or pets running across them.
Dos And Don’ts Of Sealing The Deck
For a good and long-lasting seal, you have to take care of the following dos and don’ts when it comes to sealing the deck:
Do’s
- Make sure that you have a good sealant. You want to ensure that you get a durable sealant that will last for years.
- Make sure you are not using a sealant that will peel off in two years or less. If you want something long-lasting, it is worth investing in the more expensive options.
- Clean the area before applying a sealant, and use a non-silicone, non-petroleum product like polyurethane or polysulfide.
- Check the wood for dry rot, insect infestation, and other structural damage.
- Clean the surface of the deck with a pressure washer.
- Remove any loose nails or screws that may be in the deck.
- Fill in any cracks with wood filler.
- Replace boards that are too warped to use again.
- Apply two coats of sealant for extra protection and to ensure that there are no air bubbles.
- If possible, use a professional deck sealing company. This way, they can help guide you through the process and make sure everything goes smoothly and well.
- Also, remember to protect desk joists. Desk joists are usually located near the floor, where they can get easily damaged. Desk joist protection is important because it reduces the risk of injury and helps to maintain the desk’s structural integrity.
Don’ts
- Don’t use paint as your primary sealant for your decks if you live in an area with harsh winters or high humidity levels (like Florida). Paint does not have any UV protection, which means it will wear off quickly under these conditions.
- Don’t use paint or stain on a deck that has not been properly cleaned first.
- Don’t apply a sealer that contains wax or silicone. They can cause blistering or peeling.
- Don’t use nails or screws to fasten the deck boards.
- Don’t use a sealer that is not specifically designed for sealing wood decks.
- Don’t wait until the deck is wet before you apply the sealer.
- Don’t use a water-based sealer on a deck that gets much sunlight because it will dry too quickly and may peel off.
- Don’t apply a water-based sealer if you live in an area with high humidity and temperatures, as it will dry too quickly and may peel off.
- Don’t use paint or other types of coatings on your deck boards since they will peel off when wet and make your deck slippery.
Clean Your Deck
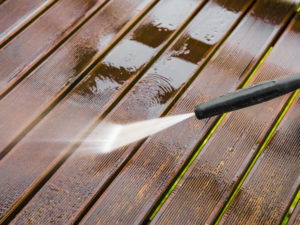
Using a pressure washer may seem like a quick and easy way to clear out all the accumulated dirt and grime; however, you need to be aware of the damage it may cause. If you have wood deck boards, a power washer’s pressure may cause splintering and damage to the fibers. If the wood surface already has some splintering, pressure washing will only make it worse. The best route is soap and water.
What about composite decking? Depending on the material, a power washer can also scar composite boards if the pressure is too high. If power washing becomes too intense, it can even chip the material. If you damage your composite deck with a vigorous power wash, it can affect the warranty.
If you’ve installed high-quality composite decking such as Trex, you should wash it on a semi-annual basis. Trex recommends a basic cleaning with a composite deck cleaner or combination of soap, hot water, and a soft-bristle brush. Note: Use of products containing bleach or acid will lighten the surface of Trex.
The biggest issue with power washing is the pressure. You can use a low-pressure setting to aid in your deck cleaning; however, the recommended method is to leave this to the professionals.
If you DIY with a power washer:
- Hold the nozzle of the power washer at least two feet off the ground.
- Use a pressure washer with a fan tip attachment/adjustment and a soap dispenser to remove soil and debris.
- Spray the deck with soap, then follow by gently scrubbing each deck board with a soft bristle brush.
- Rinse thoroughly. If dirty water from cleaning is left to dry, it will cause a film to remain on the decking surface.
If hiring a professional, be sure to ask for someone with deck experience and suggest using a relatively low-pressure setting (usually adjust the sprayer pressure to 1,500 PSI or lower).
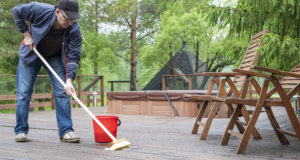
Cleaning without a pressure washer requires some scrubbing, but it’s generally safer for your deck. You’ll need a broom, garden hose, bristle brush, and a biodegradable deck-cleaning solution. Avoid bleach and acid solutions unless you’ve tested them in a small area, not highly visible. Here is a simple step-by-step process for cleaning without a power washer:
- Remove furniture and any other objects from the deck boards.
- Sweep off any leaves or other debris from your deck.
- Test your cleaner on a small area to be sure there is no staining.
- Clean with water, a cleaning solution, and a bristle brush.
- Scrub the entire deck.
- Rinse off with a hose. Be sure to rinse it thoroughly, so it doesn’t leave a film.
- Let the deck completely dry before moving furniture and décor back onto the deck.
Maintaining A Deck With Annual Cleanings
It’s vital to maintain your deck with annual cleanings. This will ensure that the wood doesn’t rot and will extend the life of your deck. You should also look for any damage or wear and replace any boards that are broken or damaged.
- The first step is to remove all furniture from the deck, sweep it off, and power wash it. This will remove dirt, mold, mildew, and any other debris from the deck.
- Once you’ve done this, you can begin repairing the surface of your deck by sanding down any rough spots with a sander.
- After this, you can apply a sealant to protect your newly sanded surface.
Cleaning your deck is not only a chore, but it’s also an opportunity to make sure that your deck is safe for you and your family. Maintaining a deck with annual cleanings will help keep the wood healthy and looking good.
Protect Your Deck
Most decks last for many years. However, the greatest danger to wood is water damage. Without proper protection, a wood foundation can start decaying long before the warranty runs out. According to homebuilders, most decks begin to split and rot around 8-10 years.
The cause: The wood joists and beams used to build your deck is exposed to moisture. Water enters through the deck boards and screws holes. Once it gets into these spaces, it sits on the wood, causing it to rot and the screws to rust. In areas with significantly hot and wet weather, the damage happens even faster.
Your deck boards will last a lot longer than your wood substructure unless you take steps to protect the joists and beams from moisture—the answer: high-quality flashing tape.
Trex Protect’s butyl tape is easy to use and simple to apply. Available in three widths –1-5/8″ (41.2 mm) for joists, 3-1/8″ (79.4 mm) for beams, and 11″ (279.4 mm) for rim joists. Trex Protect is applied as a cap (vs. wrapping) to horizontal and vertical surfaces, allowing the wood to breathe. In addition, it comes with a 25-year warranty that guarantees you will get the life out of your deck.
The small cost of flashing, a good cleaning, and sealing the deck consistently are worth preserving your beautiful deck.
How To Keep The Wood Deck From Rotting?
Wood decks are prone to rot and need to be maintained. There are many ways for you to keep your wood deck from rotting.
- The first thing you can do is seal the deck with a quality sealant. This will help to protect the wood from moisture and other elements that could cause it to decay.
- You can also try using a pressure washer on the deck every few months, which will remove any dirt or debris that may have accumulated on the surface of the wood and allow it to breathe more easily.
- You can also try using an antifungal paint, which is designed specifically for this purpose.
- If you have a lot of trees around your house, one option would be to plant some flowers around your deck. Plants act as a natural barrier between your home and the trees that may cause some damage over time.
- Finally, if you live in an area where there is a lot of rain, you can try installing a sump pump system to prevent water from entering below your deck and potentially causing damage.