How to Install Deck Flashing
By Dave Kile
Whether you are considering a new deck build or have an existing deck, most decks are anchored to something like the side of a house, townhouse, or another building. These junctures between your deck and an anchor point can collect water over time, causing the wood to weaken. As your deck ages, years of rain and snow can contribute to moisture, sometimes causing mildew and even wood rot. I have very sadly seen many beautiful decks ruined by rot. So, it’s important to be on the lookout for the first signs of trouble.
How do you combat water damage to your deck? Fortunately, there are many easy ways to slow, and even prevent damage.
What is Deck Flashing?
Deck flashing, also known as flashing membranes, is a thin protective barrier designed to prevent water from damaging your deck and the adjoining structures. It effectively seals crevices and joints where moisture can accumulate, protecting vital parts like th
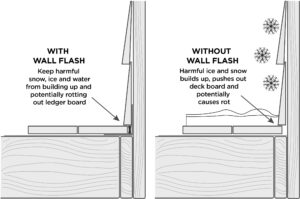
e deck’s substructure from water infiltration and potential damage.
Flashing will protect these crucial boards from moisture and mold. You can use several types of flashing to protect against water damage. The ledger board is an integral part of the deck structure. Since it supports much of the deck, keeping this area dry is one of the most important things that you can do to maintain deck health and safety.
Benefits of Deck Flashing
Deck flashing has many advantages, which include:
- Protects Against Moisture: Prevents water from seeping into gaps between deck boards and support beams, reducing the risk of mildew and wood rot.
- Strengthens Deck Structure: Butyl flashing tape securely holds screws and fasteners, reinforcing the deck’s substructure and extending its lifespan.
- Easy to Apply: The tape is simple to install, tearing easily and conforming perfectly to surfaces, making deck protection quick and hassle-free.
- Affordable Protection: Costing around $100, flashing tape is a budget-friendly way to safeguard a costly deck investment.
- Increases Home Value: A well-protected deck can boost your home’s value, and using flashing tape helps maximize your return on investment (ROI).
Tools and Materials Needed
Setting up to install flashing tape is a straightforward process and can be a breeze if you take the time to do it correctly.
Tools required:
- Deck Flashing tape!
- Measuring tape
- Utility knife
- Tin snips
- Screwdriver (an electric one is nice to have, but not essential)
- Optional: I recommend having a J-Roller, hammer, and caulk on standby
The amount of time you spend preparing is key. Ensure you have consulted your region’s (or county’s) building codes, obtained any necessary permits, and reviewed the IRC. The IRC, or International Residential Code Guide, is an excellent tool to help you with this process. Although this may seem daunting at first, taking the time to plan makes it come together quite quickly.
Step-by-Step Guide to Installing Deck Flashing
Installing deck flashing is a relatively easy process; you need to ensure the seal is secure, so your deck has multiple layers of protection. Generally, the side of your house (or other structure) already has some built-in protection, like building paper and/or roofing felt. Adding deck flashing gives your deck additional reinforcement and protection.
Step-by-Step Instructions
Installing deck flashing is a relatively easy process; you need to ensure the seal is secure, so your deck has multiple layers of protection. Generally, the side of your house (or other structure) already has some built-in protection, like building paper and/or roofing felt. Adding deck flashing gives your deck additional reinforcement and protection.
Step 1: Take Siding Off By Carefully Removing It
Carefully peel back the siding on the house. This must be done with caution, so there’s no damage done to the siding and to the under layers. Be sure not to tear the building paper while doing this.
Step 2: Measure Flashing and Score Before Cutting
Using a measuring tape, measure your flashing so it is three to four inches wider than your ledger. You want there to be an overlap, so moisture is not allowed to penetrate. Note: Flashing made for ledgers is Z-shaped; this necessary shape ensures a waterproof seal around it.
When scoring the flashing, make a depression with the utility knife. You don’t want to cut it with the utility knife (that’s what the tin snips are for).
Step 3: Flash Around the Ledger
Now we get to the actual application. It is important to do this with care, so that there are no areas of your ledger support that are unprotected. After measuring the flashing, you will need a few extra inches to have an overlap. You’ll want to work around the ledger and form the tape around it. Leaving those several inches on the side is desirable, as you will need that overlap to maintain a watertight barrier.
When you come to the corners, you will want to create a fold, so there is an overlap. This will ensure no water creeps in and causes potential water damage. The more snugly the layers conform to each other, the better.
Typically, flashing, wrapping, and caulking will help prevent moisture problems, which can lead to mold. Caulking any vulnerable areas insulates against mildew issues. Remember: Once rot sets in, it can be extremely hard to eradicate from the ledger board and connecting areas.
Step 4: Reinstall Siding
Once you’ve finished applying the flashing, ensure everything is secure and tight. If you need to use any deck nails to secure, now is the time. Once the flashing has been extended onto and around the ledger board and secured, you’re ready to reinstall your siding.
When reattaching siding, keep in mind that you want to layer the flashing. It’s best to also bring the flashing tape over the ledger and down the siding. This will help direct rainwater away from that area.
Tips and Best Practices
There are a few tips I suggest to make the installation process easier:
- Make sure you’re working in a well-ventilated area. It’s best to have air flowing freely throughout your project space.
- Always install flashing on a dry day to prevent moisture trapping.
- If you use caulk or installation foam, make sure you have sufficient airflow.
- Close all coverage gaps.
As always, it’s best to have a bit of flashing extend past the ledger. You also want to layer your protection to reduce your chances of water damage. Pay close attention to make sure there are no gaps in coverage. Additionally, if you do this when installing a new deck, it’s an easy step to fit in the process. Ledger flashing will guarantee your deck and ledger are protected for the long-term.
Conclusion
When it comes to having a beautiful and structurally sound deck, you don’t want to skimp on anything. This includes installing flashing and taking protective measures to keep your deck safe from trapped moisture. Following these steps carefully will help have a gorgeous, functional, and well-protected deck. Protect your deck from damage and harsh weather so it can bring you and your family enjoyment for years to come.
FAQs on How to Install Deck Flashing
Can Deck Flashing be Installed on an Existing Deck?
Yes! Installing flashing around any potential weak points on an existing deck takes longer, but it’s worth it. It’s also necessary to prevent water damage. After removing deck boards by the ledger to install flashing, you will want to re-attach them securely.
How Long Does Deck Flashing Last?
If properly installed, deck flashing can last 15 to 25 years. This is a worthwhile investment.
Is Deck Flashing Required by Building Codes
When it comes to building codes, strict regulations are common. As of now, there are no international requirements for deck flashing. However, it’s a good idea to check with your local building or zoning department. This is a great place to get more information on deck safety and damage prevention.