Prevent Deck Rot with Flashing Tape
Water damage may be your home’s greatest enemy. Of course, we all know to watch for leaky pipes and to guard against flood damage. But what about those hidden areas that out of sight — how do we go about waterproofing? What building materials or building products can make the most significant difference for just a small price?
Flashing tape or flashing membranes
Anywhere that water can cause damage, you might find flashing on a job site. Whether its window flashing tape around window sills, roofing flashing for shingles, vinyl siding, or door jambs, this is a useful material based on building science.
Consider the wood holding up your deck and the wood connecting your deck to your home. These are two critical spots where water leaking through your deck boards can cause hidden damage unless your beams and joists are protected.
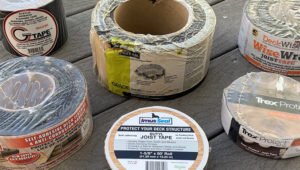
Using a quality flashing tape can protect the top of the joist, rim joist, and ledger board from developing rot and wood decay. A butyl-based tape blocks moisture and helps deck screws hold longer and is more durable than acrylic or asphalt-based tape. Flashing tape acts as a barrier between the wood and galvanized metal, such as joist hangers. It also helps seal deck fasteners and prevents moisture penetration, eliminates splitting from freeze and thaw, and provides a non-skid surface making it safer during installation.
Learn more about how choosing the right flashing tape during construction can add years of life to your deck.
Types of Flashing Tape
When choosing a flashing tape, be sure to consider these essential factors:
Acrylic, Butyl, or Bitumen?

Easy Installation
Any contractor or DIY homeowner will tell you to buy a butyl tape that is easy to install and requires little trimming. A self-adhesive butyl tape that lies directly on the boards requires minimum cuts with little overlap.
Strength
When applying flashing tape to your bearers and joists, you want to be sure to purchase a tape that is not too thin and not too thick. With thin tape, you risk the long-term durability of the tape. A thicker tape can be challenging to install. You want a tape that will last as long as your beams and joists. Trex Protect is available in two widths 1-5/8” (4.12cm) for joists and 3-1/8” (7.94cm) for double beams.
Guaranteed results
Trex Protect is guaranteed to withstand the test of time. It comes with a 25-year warranty, so it lasts as long as the decking it supports. Acrylic tape comes with only a 300-day warranty.
Flashing Tape for Decks
The average deck begins to experience water damage within 8 to 10 years. High-performance Trex Protect fights the rot and guards against costly future water damage — at a low cost. For an average size deck, measuring 12′ x 24′, five rolls of Trex Protect Joist Tape, and one roll of Trex Protect Beam Tape will be all you need. For less than a $100 investment, the deck substructure can last as long as the decking it supports. To find out exactly how much Trex Protect Joist and Beam Tape your project requires, use our Materials Estimator.
Easy-to-install, self-adhesive Trex RainEscape Wall Flash seals the space between your house and ledger board to keep water out. Wall flash is best used during the construction of a new deck and is another small investment with significant returns.
Trex RainEscape® Wall Flash comes with a 25-year warranty from Trex, the world’s #1 composite decking brand. See how Trex RainEscape® Wall Flash protects in this video.
How to Install Flashing Tape

Begin by preparing your surface. Trex Protect Joist, Beam & Rim Tape is applied to horizontal and vertical surfaces. Trex Protect Tape has three widths making it convenient to apply to joists, beams and rim joists. Use 1–5/8” (41.3 mm) Joist Tape for joists and 3–1/8” (79.4 mm) Beam Tape on all beams and 11″ (279.4 mm) for rim joists.
When pulling deck boards onto the deck, a piece of plywood or wafer board can be used to overhang the edge of the deck. This will prevent the product from rolling up and pulling up from the joist.
- Clean the joist surface making sure it is dry and free of any debris.
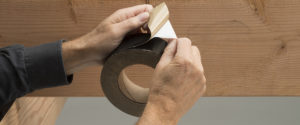
- Remove the backing while applying the tape directly to the surface. Run your hand over the tape and firmly press it onto the joists.
- After covering the joists and beams with tape, cut the tape to length with a utility knife or scissors.
As you plan your deck build, don’t forget the flashing tape. You have many years ahead to enjoy your deck! Don’t let wood rot become the enemy of your beautiful outdoor living experience.
