5 Steps on How to Repair Wood Rot
By Dave KileHow Do You Get Rid of Wood Rot?
Nothing threatens your beautiful wooden deck more than moisture and rot. While the average life spans about 20 years, depending on the construction, materials, weather, and other  environmental factors, you may need to replace your deck sooner if exposed wood begins to rot.
Introduction: How to Identify Wood Rot
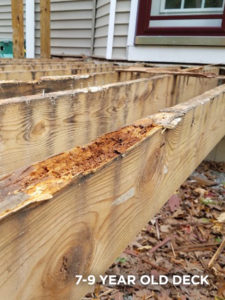
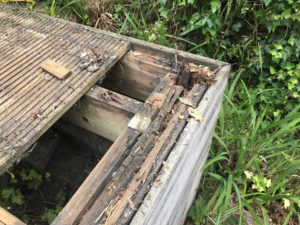
When looking for rot, you’ll want to search for spongy and discolored wood that may flake off and fall apart when wet. You can use a screwdriver to test the wood for soft spots. You can also tell if the wood is rotten by checking for these likely problem areas:
- Anywhere wood contacts the ground
- Long sheets of grayish mold or darker-looking wood
- Pest damage, those spots could be a combination of insect damage and dry rot since dry rot attracts termites and other wood-eating pests
- Leaky plumbing, guttering not properly pulling water from roofing, sprinkler system issue, and any and all other water-pooling possibilities
How Do You Fix Rotted Wood Without Replacing It?

What’s next? Assess the overall condition of your deck. This handout from the North American Deck and Railing Association (NADRA) gives a 10-point inspection checklist.
Depending on your level of comfort with maintenance, you can either fix issues yourself or, for more significant problems, call a contractor to help. For older decks, NADRA recommends hiring an ASHI-certified home inspector or a knowledgeable deck builder to inspect your deck for safety.
The main reason most people need to replace their decks is rotten wood. Pay special attention to the ledger board, where the deck attaches to the house, as this is a common source of deck failure. Equally important are the supporting posts and joists under the deck.
Depending on the damage, you may need to totally replace the wood boards and substructure. However, if the damage is minor, you may be able to fix it without replacing it. Here’s what you’ll need:
Tools required
- Paintbrush
- Putty knife
- 5-in-one, rasp, or claw hammer
- Sanding block
- Utility knife
- 100-grit sandpaper
- Chisel
Material required
- Polyester or epoxy filler: Works can be used as wood filler
- Epoxy paste: Provides gap-filling characteristics that strengthen loose fitting joints and panels.
- Epoxy resin: Provides an excellent bonding agent for softwoods.
- Epoxy consolidant: Penetrates deteriorated wood and hardens after penetration.
- Wood hardener: Strengthens decayed or rotting wood.
5 Steps to Repair Wood Rot
 If the damage is minor, follow these 5 steps to make a DIY wood rot repair. A similar process can also be used for door frames, window sills, or other solid wood elements.
- Gather tools and materials
- Remove rotten boards Use a 5-in-1 rasp, chisel, or claw hammer to remove the rotted areas of wood. Be careful not to damage the surrounding wood. If you remove a whole board, of course, replace it with a new board.
- Apply wood hardener, filler, or epoxy If minor damaged wood cannot be easily replaced, wood hardener, filler or epoxy may help strengthen the damaged area. Again, follow the directions from the manufacturer to get the best results.
- Shape and smooth If you’re using filler, press it into the recess with a putty knife. Then, carve the wood filler as needed to make it fit the space and look aesthetically pleasing. Depending on the temperature, you’ll have about 10 to 15 minutes to work before the filler starts to harden.
- Stain or seal Once your new boards and wood filler are ready, you may want to stain the wood to match the rest of the deck. Be sure to seal all new wood against moisture.
If the rotten wood affects a joist or beam, you may need to bring in reinforcements — either a professional handyman or a reinforcing beam or joist.
When to Replace
If your deck is no longer structurally sound or if the costs of rot repair begin to approach the price of a new deck, you’ll want to replace it.
But even if your deck is safe, there may be other reasons to consider a complete replacement:
- The aesthetics of your deck may reach a point where you want a wholesale change. With a new deck, you can decide everything from color to railings to lighting to new configurations. With some woodworking skills, you can customize almost any element of the new deck.
- You become wary of staining and maintaining wood and decide to switch to composite decking. With Trex, you can design a new deck, pick your favorite boards online, and find a pro experienced in Trex installation. Not only will you have a virtually maintenance-free deck when all is said and done, but you’ll also have a lot of flexibility in designing your new outdoor space.
- While putting in a new second-story deck, you might consider creating waterproof, usable space beneath your deck. With Trex RainEscape, you can install a drainage system with your new deck so you can add a ceiling and fabulous outdoor amenities such as an outdoor kitchen, fireplace, or entertainment system.
 Guard Against Future Damage
As stated in the beginning, the high moisture content is the number one enemy of your deck, as it creates the perfect environment for mildew, mold, and fungus. If continuously exposed to condensation or water, your deck may succumb to dry rot fungus or wet rot. As you might guess, wet rot fungus grows at a higher water level. Wet rot or dry rot can compromise the structural integrity of your deck.
To stop the rot, you must prevent or limit your deck’s exposure. Over time, this will involve regular sweeping and cleaning to prevent damp leaves or debris buildup. It will mean sealing any exposed wood, then install flashing and caulk where needed.
However, the best time to prevent moisture exposure is during construction. If your deck needs major repairs and you need to replace the decking boards, use this opportunity to seal the tops of your joists and beams with quality flashing tape such as Trex Protect.
Trex Protect, a butyl flashing tape, acts as a moisture barrier and prevents wood decay and rot. Unlike asphalt-based tape, Trex Protect’s butyl tape endures through high temperatures and has a broader temperature range for installation. In addition, it comes with a 25-year warranty that guarantees you will get the most life out of your deck.
In conclusion, regularly inspect your deck and repair any damaged wood. Take action before your deck becomes unsafe. Always consult a professional builder or home improvement specialist if you aren’t sure whether to repair or replace.