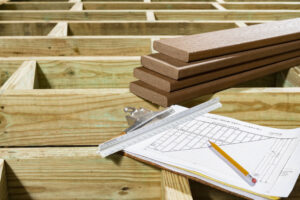
How to Build and Lay Decking
By Dave Kile With nearly three decades of experience in construction, I understand that planning and building outdoor spaces in the UK can be challenging. The wet climate, planning restrictions and smaller garden sizes make choosing your design and materials critical.
Whether you’re building a deck yourself or relying on a contractor, it’s helpful to be familiar with the entire process. Here’s a step-by-step guide on how to build decking in the UK:
Step-by-Step on How to Build and Lay Decking
Phase 1: Planning & Permissions
Before digging that first post hole, research building codes and planning permissions for your area. Putting up a deck is permitted development. You will not need planning permission, provided:
- The decking is no more than 30 cm above the ground.
- Together, with other extensions, outbuildings, etc, the decking or platforms cover no more than 50 per cent of the garden area.
- None of the decking or platform is on land forward of a wall forming the principal elevation.
If your deck is more than 600 mm above ground level, you will need balustrades. Balustrades must be at least 1,100 mm high, with no gap wider than 100 mm, to ensure safety. Stairs require handrails.
If you live in a listed building or a conservation area, or in suburban and terraced housing zones, you can expect stricter regulations. If your deck connects to a secondary space, for instance, further rules may apply. To learn more, visit this planning portal.
As you consider your ideal deck, measure the outdoor space and match the layout and design to your lifestyle. Most homeowners find that direct access to their home’s indoor kitchen is best for indoor-outdoor egress. Will you use your space to entertain? Does a simple grill area suffice, or does a full-blown outdoor kitchen fit your entertaining needs? If quiet evenings spent reading sound like paradise, privacy may be your focus. Determine how you’ll use your space and then design the zones you need.
Safety considerations should be paramount. Overloaded decks can deteriorate, especially in the damp weather conditions found in the UK. Reinforced concrete footings and steel supports may be needed for heavy structures such as hot tubs, pergolas, outdoor kitchens, and furniture. A properly designed and built deck resists tilting, sagging, loosening fasteners, and even collapse.
Material Matters
 The materials you use to build your deck will make the biggest impact on your enjoyment of it. Timber is the most popular, readily available, and affordable material choice for decking and balustrades. The downside to timber is the heavy maintenance requirements to keep the deck safe and looking good over time.
A premium alternative to timber is wood-plastic composite decking, such as Trex, the market leader, offering balustrades that can be mixed and matched with the same proven performance. Offered in a wide range of beautiful colours and made from an eco-friendly mix of recycled plastic film and reclaimed timber, Trex composite decking boards are easy to maintain and last for decades with a simple soap and water cleanup.
While timber requires sealing and staining every 1-2 years and will rot and warp without careful attention, composites won’t rot, splinter, fade or stain. Composites cost more initially than timber, but you can recoup the cost within a few years.
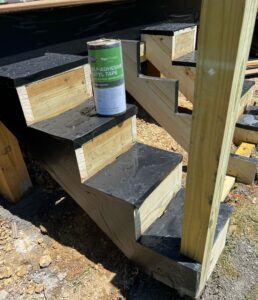
Whatever material you choose for your decking, consider using Trex Protect Joist, Bearer, and Rim tape. This butyl tape provides a protective barrier against moisture and condensation, keeping your timber substructure stronger for longer. Trex Protect waterproofs the tops of deck joists, rim joists, bearers, and the ledger board by keeping water out and helping to seal around screw holes and metal fasteners to prevent corrosion. It’s a good solution for the damp UK environment, which is hard on decks.
Phase 2: Preparing the Site

Once you decide how you’ll use your ideal deck space, consider these ground preparation tips:
- Accurately measuring and marking your deck’s perimeter and the location of support posts is crucial for a level and structurally sound deck. Measure your deck footprint and mark the corners with stakes.
- Run string lines between stakes to outline the deck perimeter. Measure diagonals, too, to ensure it is square.
- Clear the site by removing grass, weeds, trees and shrubs within and close to your deck’s footprint. Strip topsoil by taking away 5-10 cm of the top layer
- Level the ground along the string lines. Scrape down high spots and fill low spots with a compacted sub-base such as crushed stone to achieve a flat surface.
It’s crucial to have a strong and sturdy foundation. There are a number of ways to build a deck foundation. Your choice will depend upon the slope of your yard, deck height, soil conditions, and load requirements.
The most common include:
- Concrete posts/footings (best for raised, heavy decks)
- Deck blocks or pad stones (quick, ground-level)
- Adjustable pedestals (urban/rooftop or uneven ground)
- Ground screws (sloped sites, eco-friendly alternative)
- Helical Piles (ideal for heavy structures, difficult terrain)
- Existing slabs/concrete bases (for simple low-level decks)
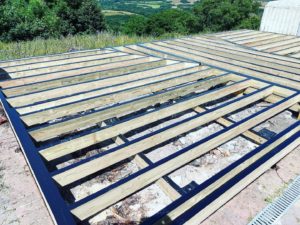
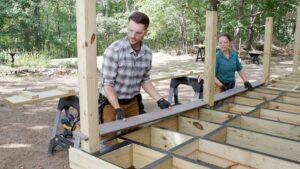
Phase 3: Installing the Frame
 After choosing your posts or support columns, turn your attention to the rest of your deck’s framing, which supports the decking boards above. The main elements for building the frame/substructure are:
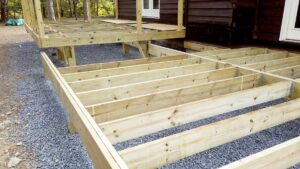
- Ledger Board: Horizontal board secured to the house wall
- Bearers: Horizontal members supporting joists. Typically spaced every 1.8-2.5 m
- Joists: Repeated horizontal members that run perpendicular to the beams. Commonly spaced 400 mm to 600 mm centre-to-centre if using timber decking; 300 mm to 400 mm centre-to-centre if using composite decking
- Rim Joists or End Joists: Outer joists forming the perimeter of the deck frame and help to keep the interior joists square
- Noggins or Blocking: Short pieces installed between joists to add lateral strength and keep joists upright. Also serve as points for attaching balustrade posts or stairs
- Bracing: Diagonal structures added between posts or underneath joists on elevated decks
During the installation process, it’s critical to periodically check that your foundation and frame are level. Some tips to keep in mind:
- Start with a level foundation. All posts, blocks and footings should be set at the same height before laying bearers
- Use string lines and levels
- Always measure from the same reference point, such as a corner post or ledger end
- Check the level both lengthwise and widthwise across joists
- Recheck diagonals whenever you add a new rim joist or brace
Phase 4: Laying Deck Boards
 Adhering to correct gapping guidance is paramount when laying the decking boards. Gapping allows for drainage, airflow, and timber expansion, and varies depending on the decking material chosen. Timber tends to expand and contract due to changes in moisture, while composites tend to expand and contract due to temperature changes. Incorrect gapping can cause buckling or warping, while excessive gaps are unsafe and unsightly.
- Timber gapping: Leave 5-6 mm between boards, 2-3 mm at ends, and 10 mm at walls and other structures
- Composite gapping: Manufacturers typically advise leaving 3-6 mm between boards, 3-8 mm at ends, and 10-15 mm between boards, walls, or posts.
Let your design style shine when laying out your decking boards. Here are a few orientation and installation tips:
- Always lay out a few boards before fixing to ensure you like the look
- Diagonal and patterned designs use more material so consider that as you set your budget
- Run boards perpendicular to the house to create a traditional look. This popular design creates minimal waste and is good for small or narrow decks
- Add one or two deck boards around the perimeter at 90 degrees (a picture frame design) to add visual interest and also hide cut ends or scallops
- Run boards at 45 degrees to make small spaces look larger. Requires tighter joist spacing
- A herringbone or chevron design creates an interesting parquet-like finish. Works best on larger decks
- One or two boards that run perpendicular across the centre of the deck (breaker board) is often used to break up long runs of boards
- Alternate board widths or stagger lengths for a modern feel
It’s easy to overlook the fasteners used to adhere decking boards to the frame, but this choice can make all the difference in performance and the aesthetic enjoyment of your space.
Generally, deck screws are the most practical and cost-effective option for budget or timber decks. Use stainless steel or coated screws to avoid the corrosion that comes with standard screws and nails. For a clean, seamless look with no visible screw holes, use hidden fasteners on composite decks.
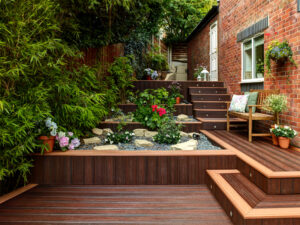
Phase 5: Finishing Touches & Clean-Up
 If you have an elevated deck, you’ll need balustrades and perhaps even steps. There are myriad balustrade options to choose from. Timber is the most cost-effective and readily available material, but you can elevate the look of your deck with aluminium, steel, and composite balustrades featuring infills such as glass and mesh, as well as round or square composite or aluminium balusters.
Finishing the sides of your deck with decorative skirting or fascia can give your outdoor space that little something extra. Choose simple white PVC trim or composite fascia that matches the composite decking boards.
Due to the UK’s wet, cool climate, decks may require extra care to maintain their appearance over time. Both timber and composite decks benefit from regular cleaning and maintenance.
For timber decks, applying a wood preservative protects against weather damage, rot, moss, algae, and insect infestations. This is especially critical for shaded gardens. Decking oils repel water, keeping the boards from flaking and disintegrating. Reseal every 1-2 years. Add colour with decking stains.
Composite boards require less maintenance. A periodic cleaning is all that is needed to keep boards clean and looking new.
Common Mistakes to Avoid
Here is a helpful list of common mistakes to avoid when building a deck:
- Ignoring planning permissions, which could be costly
- Underestimating load requirements can lead to undersized joists and unsafe decks
- Not considering sun and shade orientation, which can accelerate algae buildup in damp climates
- Not designing for doors, flow and lifestyle
- Improper joist spacing can lead to bouncy or sagging boards
- Ignoring gap requirements, which could cause boards to warp, crack and buckle
- Using incorrect fasteners
- Failure to preserve cut ends to stop rotting
- Applying stain and oils to damp timber can cause peeling and poor absorption
- Neglecting regular maintenance
Conclusion
A carefully planned deck design can deliver years of enjoyment and the confidence that comes from making a sound investment, even in the face of the UK’s climate challenges. By focusing on the details—such as proper joist spacing, the correct fasteners, and protective barriers like Trex Protect—you’ll reduce the risk of costly or unsafe surprises and help your deck stay as safe and beautiful as the day it was built.
Sources
https://www.planningportal.co.uk/permission/common-projects/decking/planning-permission
https://trexprotect.com/uk/blog/how-to-build-a-raised-deck/
https://trexprotect.com/uk/blog/how-to-protect-your-deck/
https://trexrainescape.com/resources/types-of-deck-footings/
https://www.deckexpressions.com/blog/deck-foundation-options/
https://trexprotect.com/uk/blog/creative-raised-decking-ideas-for-your-garden/
https://trexprotect.com/blog/how-to-use-concrete-deck-blocks-for-deck-posts/
https://www.tdca.org.uk/timber-decking/
https://www.wickes.co.uk/how-to-guides/garden-landscaping/plan-build-a-raised-deck
https://www.robbins.co.uk/wp-content/uploads/2022/07/The-Timber-Decking-Handbook-2022.pdf
https://www.diy.com/ideas-advice/how-to-build-a-raised-deck/CC_npci_100131.art
https://www.tdca.org.uk/media/gsge4vxl/tdca_cop_raised_timber_decks_e62018.pdf?
https://posh.co.uk/living/what-is-the-recommended-spacing-between-decking-boards/
https://www.acornfencingaldershot.co.uk/blog/does-decking-need-foundations-uk