How to Build a Raised Deck
By Dave Kile I’ve been in the decking industry for decades, and one thing I’ve learned is that no two gardens or homeowners are the same. That’s one of the reasons I love the idea of a raised deck. It’s universal enough to apply to almost any person or location, yet flexible enough to accommodate different sizes, styles, and uses.
In the UK, raised decks are particularly popular for maximising the use of sloped gardens or creating a seamless indoor–outdoor space. More than one in five UK homeowners are replacing lawns with decking or patios, and on average, “about 87 per cent of UK households have access to a garden,” according to 2024 UK Garden Statistics and Trends. People want to use their outdoor space more, and decking is a brilliant way to make that happen, as long as it’s done right from day one.
From the very first step, I always tell people: protect your investment. Using materials like Trex® Protect Joist and Bearer Tape means your substructure will be shielded from moisture, rot, and decay. I’ve seen the difference firsthand. Decks built over a decade ago with protection still have solid, reliable framing today, while untreated decks often need repairs far sooner.
1: Check Regulations and Plan Your Deck
Every great deck starts with a budget for tracking deck cost and a plan that adheres to building codes and planning permissions. UK regulations aren’t complicated. Any reputable, professional builder will know them. But as a build-it-yourself homeowner, they’re not something you can skip.
- If your deck will be over 300mm above ground level, you might need planning permission.
- Between your deck and any other outbuildings, you can’t cover more than 50 per cent of your garden.
- If you live in a listed building or conservation area, expect stricter rules.
UK building regulations are also worth knowing, and they require that if your deck is more than 600mm above ground level, it must have a balustrade. The railing should be at least 1,100 mm high, and no gap can be wider than 100 mm to ensure safety. And stairs need handrails.
I’ve seen people measure only from the lowest point of their garden. Councils often measure from the highest point, which can create issues if your garden slopes.
Once the paperwork’s clear, I grab some string and pegs to mark out the deck layout. I’ll walk the space, picture where the furniture will go, think about where the sun hits, and decide on my deck features planning — things like stairs, skirting, lighting, and even built-in benches. Trust me, this part is worth taking your time on.
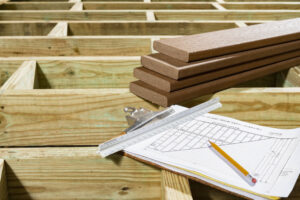
Step 2: Gather Tools and Materials for Raised Deck Building
If you’ve decided to go with a professional builder, you won’t need your own tools and materials. But I suggest that every homeowner be as educated as possible. Knowing what’s expected will prepare DIYers and equip homeowners to hire the right builder.
Essential Tools for Building a Raised Deck
- Tape measure and pencil — measure twice, cut once.
- Spirit level — don’t rely on your eye, no matter how good you think it is.
- Spade or post hole digger — for digging those foundations.
- Drill/driver with bits — cordless makes life a lot easier.
- Handsaw or circular saw — for those accurate cuts.
- Hammer — still comes in handy more than you’d think.
- Safety gear — gloves and eye protection. Always.
Materials for Building a Raised Deck
Pressure-treated timber or composite decking boards.
- Structural posts and beams.
- Joist hangers and galvanised fixings (rust-proof is a must in a UK climate).
- Trex® Protect Joist and Bearer Tape — ideal to protect deck joists.
- Concrete mix or deck blocks for footings.
- Balustrade components (if required).
- Skirting panels (optional).
Cheap fixings will let you down. I’ve seen rusted screws snap within a couple of years, especially in high-moisture and seawater areas. Always go for galvanised or stainless steel.

Step 3: Prepare the Ground and Set Footings
This stage sets the foundation — literally — for the whole project. The better the base, the longer your deck will last.
The first step is to clear away any grass, weeds, stones, or other obstructions in the way. If your garden slopes or the ground is uneven, take the time to level it out as much as you can by adding dirt and tamping it down.
I use spray paint to mark exactly where each post will go. Then I dig to the proper depth (usually about 450mm), pour in the concrete, and set my post anchors while it’s still wet. If using deck blocks, the same principle applies: they must be level and evenly spaced.
Don’t set posts directly into concrete without anchors — the trapped moisture will shorten their life. Anchors keep the timber off the wet surface, allowing air circulation.
Step 4: Install Posts and Frame
 Now we start to see the shape of the deck take form, as the posts are set solid in the anchors. Be sure to check that each one is plumb.
Then the beams go in with galvanised connectors, followed by the outer frame. I always check for a square at this point as well. If your frame’s off, laying the boards becomes a headache later.
Step 5: Install Joists, Apply Trex® Protect Tape, and Follow Installation Best Practices
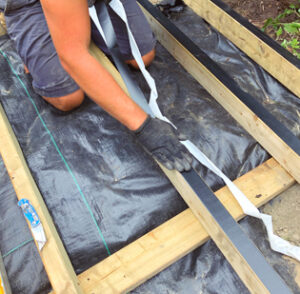 With the frame in place, it’s time for the joists. I go for 400mm centres here in the UK. Once they’re in, I cover the tops, ledger, and rim joists with Trex® Protect Joist Tape.
Trex® Protect creates a watertight seal over the joists, protecting screw holes from moisture. In the UK’s damp conditions, unprotected timber is constantly exposed to rain and condensation. That moisture seeps into the grain, accelerating rot. Be sure to apply the tape on a dry day. Moisture trapped underneath can affect the bond. Press it firmly into place, so it sticks to every contour of the timber.
Step 6: Lay Decking Boards
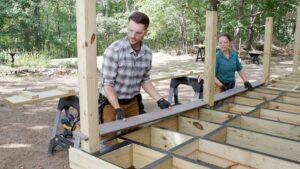 Now comes the stage for fitting the boards. When connecting to a home, I start from the outer edge and work inward, using spacers to create neat, consistent gaps. If your raised deck is a standalone, follow the same principle, working from one side toward the next.
When using composite boards, follow the manufacturer’s recommendations for spacing, as they expand and contract with changes in weather. Keep an eye on alignment as you go; even a small shift at one end can throw the whole row off.
For timber boards, I like to stagger the joints for strength and visual appeal. Pre-drilling can help prevent splitting, especially near the ends of boards.
To make a special deck design, consider some raised deck ideas. Picture framing is one way to elevate the look by creating a border at the perimeter or by incorporating a second colour. It’s a small touch that makes a big difference and finishes off your space with a slightly higher design.
Step 7: Add Railings, Skirting, and Stairs (if required)
 This stage brings everything together and completes the deck, making it safe and finished.
If your deck’s over 600mm high, you’ll need railings. To protect children and pets, the gaps should never be more than 99mm. Always double-check railing fixings. They take more stress than you think, especially if people lean or rest on them regularly.
For stairs, I cut the stringers, fit the treads, and add a handrail. Skirting’s a nice extra, as it tidies up the look and prevents things (or wildlife) from getting underneath.
Step 8: Finishing Touches, Cleaning Composite Decking, and Ongoing Deck Maintenance
 With the build complete, I give everything a good sweep and collect offcuts. Then I stand back and take it in — that’s the best moment for me, seeing a space ready to be enjoyed.
To keep it looking and performing its best:
- Clean up spills as they occur, including fallen leaves, to prevent stains or moss growth.
- Avoid using metal shovels for snow removal since they can scratch composite boards.
- Inspect your deck at least once a year for loose boards or materials, damaged fasteners, or signs of wear.
- Verify that the Trex Protect tape remains intact.
- Clean your deck in the spring and fall.
Following installation best practices and performing regular deck maintenance later will save you hours of repair work and give you endless hours of enjoyment. I’ve had customers tell me their decks still look fantastic a decade on — the secret is building it the proper way, making regular checks, and using the right protective materials from the start.
Sources
Dave Kile, Trex Protect UK Blog, “Creative Raised Decking Ideas for Your Garden”
https://trexprotect.com/uk/blog/creative-raised-decking-ideas-for-your-garden/
Dave Kile, Trex Protect UK Blog, “How Do You Protect Deck Joists?”
https://trexprotect.com/uk/blog/how-do-you-protect-deck-joists/
Dave Kile, Trex Protect UK Blog, “What Is Deck Joist Tape?”
https://trexprotect.com/uk/blog/what-is-deck-joist-tape-a-complete-overview/
Dave Kile, Trex Protect UK Blog, “The Top 5 Reasons to Use Deck Flashing Tape”
https://trexprotect.com/uk/blog/the-top-5-reasons-to-use-deck-flashing-tape/
Dave Kile, Trex Protect Blog, “How to Clean Your Deck the Right Way”
https://trexprotect.com/blog/how-to-clean-your-deck-the-right-way/
UK Government Planning Portal – Decking
https://www.planningportal.co.uk/permission/common-projects/decking/planning-permission
Eurocell, May 6, 2025, “The UK’s best value cities for garden space – and how to make the most of yours in 2025”
https://www.eurocell.co.uk/blog/best-value-cities-for-garden-space
Paving Shopper, Nov. 16, 2024, “UK Garden Statistics and Trends 2024”
https://pavingshopper.co.uk/blogs/news/uk-garden-statistics-and-trends-2024
Statutory Guidance, Protection from falling, collision and impact: Approved Document K