Deck Joist Spacing Explained: Best Practices
By Dave KileJoists are one of the key components of a deck’s foundation and, together with the footings, posts and bearers, determine the safety, strength and longevity of a deck. I’ve seen the tragic results of deck failure, and too many times it is due to an incorrectly installed substructure. It’s critical to give careful attention to joist installation.
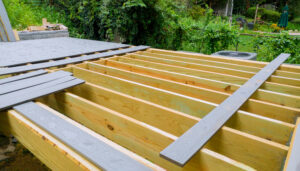
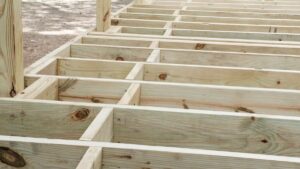
Joists are the repeated structural horizontal framing components that run parallel to each other, sitting between the primary bearers and ledger boards. When combined with the blocking or bridging (short pieces between joists), they provide lateral stability to the framing.
Because building a safe structure is your top priority, it is critical to heed joist installation requirements.
What is Deck Joist Spacing?
Joists support the load above from the deck boards, railing, hardware, other accessories (pergolas, outdoor kitchens), and foot traffic. Correct joist spacing will prevent sagging and a springy feeling underfoot as you walk across the deck. If joists are spaced too far apart, boards will sag over time, adversely affecting the structural integrity as well as your safety and enjoyment of the deck.
Local building codes dictate joist requirements. Codes will have strict minimum standards to account for the weight the deck must hold.
Joists are most often made from pressure-treated timber, the most affordable and readily available material. Alternatives include composite and aluminium. For joists made from timber, joist tape, such as Trex Protect, can protect the tops of joists from water damage, further extending the life of your framing and entire deck.
Factors That Determine Joist Spacing
A number of factors influence the correct spacing of joists. They are:
- Deck material and thickness
- Board orientation
- Joist size and grade
- Span
- Load from decking, railing, accessories, and foot traffic
- Local building codes
Why Joist Spacing Matters
Joist spacing matters because it directly affects the structural integrity of your deck and safety. Incorrect joist spacing will lead to the sagging or cupping of deck boards above. Closer joist spacing reduces or eliminates the bouncy feeling underfoot.
 Other considerations include:
- Deck board longevity: Correct joist spacing preserves the lifespan of the deck board and fasteners above. Decking may crack or warp without the proper support
- Trip risks: Sagging boards can lead to unsafe conditions
- Code compliance: Failure to adhere to local codes could lead to inspection non-compliance, fines, costly corrections, and possibly require you to tear down your deck
Recommended Deck Joist Spacing
Joist sizes are typically 2″x8″ ,2″x10″ or 2″x12″. The size chosen depends on the distance the joist needs to span to carry the load. The larger the span and the more weight it has to support, the larger the joists will be.
Joist spacing is the distance from the centre of one joist to the centre of the next. You will often see it written as 400 mm o.c. or 16 inches on centre. As previously pointed out, the correct spacing depends on a variety of factors.
For softwoods, spacing is generally 400-600 mm on centre, depending upon the size of the deck board. For heavier composites, spacing is usually 300-400 mm on centre.
Installing joists 300 mm or less may also be required for joists that carry heavier loads, have longer spans, or hold intricate deck patterns.
Stair stringers are typically installed 300 mm or less because of the added force from stepping on the treads.
If you are replacing timber decking with composite decking and find that the existing joists are spaced 400 mm on centre, adding one new joist between each of the existing joists is a simple fix.
This recommended deck joist spacing chart, based on TDCA Decking Handbook, covers the most common decking scenarios in the UK and serves as a quick reference:
| Decking Material | Board Thickness | Joist Size | Recommended Joist Spacing |
| Pressure-Treated Timber | 25 mm (≈1 in) | 2×6 | 400 mm (16 in) OC |
| Pressure-Treated Timber | 38 mm (≈1.5 in) | 2×8 | 400–600 mm (16–24 in) OC |
| Pressure-Treated Timber | 38 mm (≈1.5 in) | 2×10 | 400–600 mm (16–24 in) OC |
| Pressure-Treated Timber | 38 mm (≈1.5 in) | 2×12 | 600 mm (24 in) OC |
| Cedar/Redwood | 25 mm (≈1 in) | 2×6 | 400 mm (16 in) OC |
| Cedar/Redwood | 38 mm (≈1.5 in) | 2×8 | 400 mm (16 in) OC |
| Cedar/Redwood | 38 mm (≈1.5 in) | 2×10 | 400–600 mm (16–24 in) OC |
| Cedar/Redwood | 38 mm (≈1.5 in) | 2×12 | 600 mm (24 in) OC |
| Composite/PVC | 25 mm (≈1 in) | 2×6 | 300–400 mm (12–16 in) OC |
| Composite/PVC | 25 mm (≈1 in) | 2×8 | 300–400 mm (12–16 in) OC |
| Composite/PVC | 25 mm (≈1 in) | 2×10 | 300–400 mm (12–16 in) OC |
| Composite PVC | 25 mm (≈1 in) | 2×12 | 400 mm (16 in) OC |
Common Mistakes To Avoid
- Building your deck without consulting local building codes
- Ignoring deck manufacturer span tables and recommendations for spacing and installation
- Not setting a realistic budget
- Using cheap timber for framing. Select high-quality timber or even composite or aluminium, if budget allows
- Failure to account for board thickness when planning your deck
- Spacing that is too wide will lead to sagging as well as structural failure
- Ignoring load considerations, which can lead to your deck collapsing
- Only measuring the first few joists, which could allow spacing to drift
- Joists not level or crowned incorrectly
- Using the wrong fasteners
- Skipping moisture defense, especially in the damp UK climates which accelerates timber joist decay.
- Embarking on a DIY project without the proper skills. Safe deck building is paramount, so consider consulting or hiring a deck builder
- Failure to protect joists with Trex Protect butyl tape, which can accelerate wood rot
Tips for DIY Builders
If you’re going to tackle building the deck yourself, make sure you have adequate skills to build it safely. Here are some tips to think about:
- Wear the appropriate personal safety equipment, including eye and ear protection, gloves, long pants, long-sleeved shirt, and reinforced toe shoes
- Have the proper tools on hand and know how to use them safely
- Lay out the ledger/rim first. They serve as boundary boards

- After marking the joist’s centre points, use a chalk line or snap line across boundaries
- Measure from the ends for a fixed reference
- Check joist alignment and level. Use long straight-edge or string line along tops of joists to check that they lie in the same plane. If some joists are “crowned” (curved), install crown up so that as the lumber dries, the timber settles more flat
- Use temporary blocks of scrap wood cut to the appropriate spacing (minus joist thickness) between joists while installing for consistency.
- Re-check spacing before fixing each joist. This is especially important for long spans
- Blocking or a bridge for stability. At mid-span, or for wide spans, install blocking between joists to prevent twisting and improve load distribution
Adjusting Spacing for Non-Standard Layouts
For odd-sized deck designs, or for boards that are laid at angles or with curves, you’ll need to adjust joist spacing. Consider:
- Diagonal boards: Space joists closer together because boards span a greater distance between supports

- Curved decks: May require custom-engineered joist layout
- For rail posts and existing walls: Account for these early in the planning to ensure joists align and to avoid conflict with posts and hardware.
- Heavy loads: Including heavy items in your deck design, such as hot tubs, kitchen components or planters, may require closer joist spacing, tighter spans or additional foundation support bearers.
- Consider double joists for added support for the outermost framing or at butt joints, or use Trex’s new butt joint clip.
Get It Right
Take the time to get your joist spacing right from the start. By planning ahead and following best practices, local codes, and manufacturer’s guidelines, you’ll save yourself potential problems later. Your deck’s strength comes from the ground up. A solid, well-planned foundation sets the stage for an outdoor space that is safe, looks great and gives you and your family years of enjoyment.
Sources
https://ultradecking.co.uk/a-uk-guide-to-decking-subframes-joists/
https://trexprotect.com/uk/blog/how-do-you-protect-deck-joists/
https://trexprotect.com/uk/blog/what-is-deck-joist-tape-a-complete-overview/
https://trexprotect.com/uk/blog/wood-rot-treatment-how-to-identify-and-treat-it/
https://www.decks.com/resource-index/framing/deck-joist-sizing-and-spacing
https://www.uksleepers.co.uk/news/how-far-apart-should-decking-joists-be-
https://www.trex.com/academy/how-to-guides/all-guides/how-to-install-deck-joists
https://glenalmondtimber.com/wp-content/uploads/2024/04/tdca-decking-handbook.pdf
https://www.robbins.co.uk/wp-content/uploads/2022/07/The-Timber-Decking-Handbook-2022.pdf