What is Deck Ledger Flashing?
By Dave KileThe ledger board can be the Achilles heel of your home’s structure if it’s not correctly installed and protected. This bearer of timber attaches your deck to your home and runs horizontally along with your house’s framing. Water can damage your ledger board and compromise your deck and home. It’s imperative that the ledger board is waterproof and protected.
Moisture is the enemy of timber. Don’t skimp on flashing anywhere you have exposure on the exterior of your home: windows, doors, shingles, and decks.
The International Residential Code (IRC) requires using corrosion-resistant flashing. Let’s look at types of deck flashing and how it can guard against damage.
Types of Deck Ledger Flashing
Deck ledger flashing can come in a variety of shapes and materials:
- Roll form
- Rigid Z or L shaped
- 3-metre sheets made of stainless steel, copper, or vinyl
Avoid having galvanized steel or aluminium flashing comes in contact with an ACQ pressure-treated timber ledger board because it will corrode. If installing copper flashing, be sure to use copper nails.
How Deck Ledger Flashing Works
 While metal flashing (such as aluminium flashing or copper flashing) and extra layers of roofing felt (tar paper) were often used in the past to cover the face of the ledger, today, vinyl Z flashing and rolls of vinyl-back flashing provide better protection. In fact, the house’s sheathing should be triple protected from moisture — with house wrap, or building paper or roofing felt stapled to the sheathing, then with back flashing; and then the Z flashing. Many builders also add caulk.
Install Flashing
The following highlights from this Decks.com article provide a step-by-step look at how to DIY deck ledger flashing. While these instructions are a useful general guide, check your local codes to ensure compliance with regional building laws. If doing DIY flashing or deck construction sounds like too much, find a quality deck builder in your area. This is especially true if you’re working on an existing deck.
- Measure carefully.
- Cut the piece of flashing with tin snips.
- Score with a utility knife. Be sure to clamp a straight edge to the surface to ensure a straight line. This is just a score, not a cut. You do not want to cut through the flashing. Cutting halfway through will allow it to bend very easily.
- Bend flashing with a block and framing square for a right angle bend to fit inside the house corner wall.
- Cut flashing. When the back flashing needs to be cut around an obstacle, measure for the notch and cut with tin snips, or slice several passes with a knife.
- Slip flashing under the siding. When slipping the flashing under the siding, be sure to slide the flashing to the left or right of the ledger by at least 50.8 mm. This will ensure water doesn’t infiltrate behind the flashing.
- Slip the back flashing under the siding at least 76.2 mm at the top and the sides. You may need to pry out the siding first. If nails are in the way, pull them out. Pry the siding out near a nail, then push the pry bar against the nail as you partially tap the siding back in. That should pop the nail head out far enough so you can pry it out. Take care not to tear the building paper or tar paper while you do this. Attach the back flashing with as few nails as necessary to keep it lying flat.
- Nail the Z flashing over the top of the ledger.
- Slip the flashing behind the trim.
- Overlap the flashing in the corner.
- Be sure to caulk the flashing. Squirt a bit of gutter caulk sealant or silicone sealer to seal any joints that don’t overlap 101.6 mm or more. At this point, you can also caulk the inside corner of the ledger.
- Slip the bottom piece of the siding under the next-to-bottom piece. You may need to cut notches for obstacles, and you may need to pull out nails in order to slip the piece up far enough.
- Use a 31.75 mm thick board to hold the siding at the proper height.
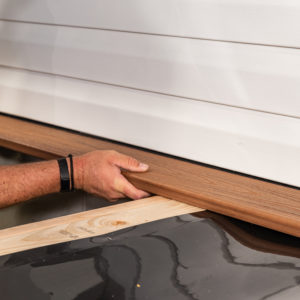
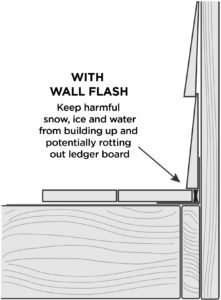
- To keep water and ice from building up between the first deck board and the flashing, use an EPDM foam, such as Trex RainEscape® Wall Flash.
Mind the Gap
 The first deck board is generally mounted slightly away from your house, leaving a small gap where water and ice can become trapped. Over time, this trapped water will cause your timber, even treated timber, to rot.
Trex RainEscape® Wall Flash minds the gap between your ledger board and your house — where water damage can start. It seals the space between your house and the deck to keep water out of the gap. This easy-to-install, self-adhesive wall flash comes with a 25-year warranty from Trex.
Especially if you’re cutting vinyl siding to install a new deck ledger board, you must be careful to ensure moisture cannot touch the timber where your deck and home meet. While Trex RainEscape® Wall Flash protects the gap, the ledger board itself also needs to be covered.
Flashing for the Whole Deck
As important as it is to cover the deck ledger, flashing also can protect the deck joists, floor joists, bearers, and rim joists from developing rot and timber decay. A high-quality butyl-based tape, such as Trex Protect, blocks moisture to preserve your deck’s substructure.
Other benefits of flashing tape: it can act as a barrier between the timber and galvanized metal such as joist hangers, helps seal deck fasteners and prevents moisture penetration, eliminates splitting from freeze and thaw, and provides a non-skid surface making it safer during installation. Flashing makes the metal more corrosion-resistant.
Your decking boards, especially if they are composite decking, should last 25+ years. Be sure your timber substructure lasts just as long.