How to Install Deck Ledger Flashing
By Dave KileWhen planning a new deck, it’s fun to spend time choosing colours and styles for your deck boards and railings. It’s fun to dream of what your deck could be. Yet, as you think about what you’ll see day to day on your beautiful new outdoor space, it’s essential to think now about what you won’t see: the timber that supports your deck.
Timber that gets wet again and again will weaken and show damage over time. Stop the rot by being proactive during deck construction.
Flashing adds the secret superpower your deck needs to fight water damage and timber rot.
With flashing, you can add years to the life of your deck.
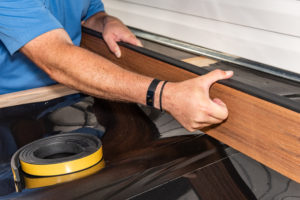 Trex RainEscape® Wall Flash minds the gap between your first deck board and your house — this is where water damage can start. The first deck board is generally mounted slightly away from your house and leaves a small gap where water and ice can become trapped. Given time, this trapped water will cause your timber to become rotten.
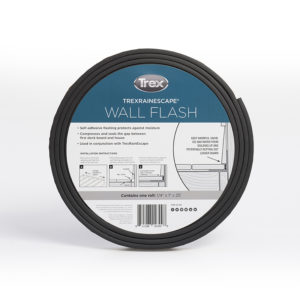
Use Trex RainEscape Wall Flash to seal the space between your house and the deck to keep water out of the gap. With a 25-year warranty from Trex – the world’s #1 deck company — easy-to-install, self-adhesive wall flash is a must-have.
Step by Step
Trex RainEscape® Wall Flash is one piece of the overall flashing system you need to keep your timber safe when adding a new deck to your home or replacing an existing deck.
Especially, if you’re cutting vinyl siding to install a deck ledger board, you must be careful to ensure moisture cannot touch the timber where your deck and home meet. If you live in an area with a freeze/thaw cycle, this protection is even more critical. The wall flash prevents ice build-up that can expand, contract and move the deck board over time.
Whereas metal (such as aluminium flashing) and extra layers of roofing felt (tar paper) were often used in the past, today, vinyl Z flashing and rolls of vinyl-back flashing provide better protection. The house’s sheathing should be triple protected from moisture — with building paper, or roofing felt stapled to the sheathing; then with back flashing; and then the Z flashing. This also protects the ledger board.
This Decks.com article provides a step-by-step look at how to DIY flashing. For detailed instructions and photos see the full article; below are the highlights. Also, while these instructions are a useful general guide, check your local codes to ensure compliance.
- Cut a piece of flashing with snips. Tin snips are the fastest and safest tool to cut vinyl flashing. You may also use self-adhering flashing.
- Score with a utility knife, but do not cut all the way through. Clamp a straight edge to the surface to ensure a straight line. Remember, this is a score, not a cut. By cutting halfway through you will allow it to bend very easily.
- Use a block and framing square for a 90-degree bend to fit inside the house corner wall—Mark for cutting to length with a square and pencil. Then, cut with tin snips. In order to make a bend at an inside corner, clamp a straight edge onto the piece and score with a knife, and bend carefully.
- Measure carefully to cut around the door.
- Cut flashing.
- Slip flashing under the siding.
- Slip the siding up and around the door. Slip the back flashing under the siding at least 8 cm at the top and the sides. You may need to pry out the siding first.
- Attach the ledger board.
- Nail the Z flashing over the top of the ledger. When nailing your vinyl Z flashing to the house, be sure to nail every 30 cm along the house with roofing nails.
- Slip the flashing behind the trim. Install flashing that is made for ledgers. It should be vinyl and have a “Z” shape that wraps around the top of the ledger.
- Overlap the flashing in the corner. At an inside corner, slide the first piece in so its bottom lip slips in between the two boards.
- Be sure to caulk the flashing. Squirt a bit of gutter caulk or silicone sealer to seal any joints that don’t overlap 10 cm or more. At this point, you can also caulk the inside corner of the ledger.
- Carefully slip in the siding. Slip the bottom piece of siding under the next-to-bottom piece. You may need to cut notches for obstacles, and you may need to pull out nails in order to slip the piece up far enough.
- Use 3 cm thick board to hold the siding at the proper height.
 To keep water and ice from building up between the first deck board and the flashing, use an EPDM foam, such as Trex RainEscape Wall Flash.
Find a quality deck builder in your area if DIY isn’t for you.
More Waterproofing
While making sure you waterproof between the house and deck, it’s also a good idea to protect your substructure during construction. The substructure, including bearers and deck joists, support your deck boards.
Choose a joist and bearer tape such as Trex Protect® to cover the timber and shield it from moisture. Trex Protect is a non-skid, self-adhesive deck flashing tape that shields the tops of joists, bearers, rim joists, and the top of the ledger board from moisture that can lead to the development of rot and timber decay.
Check out these benefits of flashing tape
- Acts as a barrier between timber and galvanized metal such as joist hangers
- Helps seal deck fasteners and prevents moisture penetration
- Eliminates splitting from freeze and thaw
- Provides a non-skid surface, making it safer during installation.
Protecting the ledger board, substructure and all the timber in your deck at the time of construction is key to fighting timber’s biggest enemy, water. Investing in flashing will pay off for years to come — even if you don’t see it.