How to Create a Waterproof Deck
By Dave KileJust as a tree has many rings, protecting your timber requires you to think beyond the surface. Deck waterproofing is more than skin deep! To preserve your deck’s longevity, you have to think about what’s protecting the timber you can and can’t see.
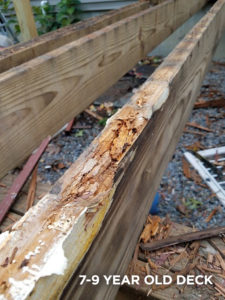
In fact, serious damage often starts with the joists and the boards that fit against the house. The average deck begins to experience water damage within 8 to 10 years.
 Guard against the water with the right preparation, sealing, flashing, and drainage. Some of these steps are easy do-it-yourself (DIY) projects, while more extensive waterproofing or deck repairs may need to be done by a professional.
Sealing
Deck maintenance is critical, especially for a completely timber deck, because unprotected timber will rot much more quickly. The best deck sealants coat the fibres, like wax on a car, so your timber can resist moisture. Using a protective polyurethane topcoat seals your timber deck and increases its longevity.
A sealant is usually clear, while stain colours your timber and often gives it a richer look. Deck stain can be semi-translucent or opaque.
If your deck is made of plywood, you may consider using rubberized paint to cover the deck surface. A rubberized coating will repel water and minimizes slippery surfaces. Apply it as you would paint, stir the product thoroughly with a paint stir stick, pour some paint onto the deck, spread it with an ordinary paint roller.
Depending on your product, you may need a primer and a topcoat for the best result.
Stain and sealant lose their ability to protect and must be reapplied over time. Depending on how protected your deck area is from the elements and the amount of foot traffic it sees, you may have to re-stain or re-seal every year. Some newer products, however, can last longer, up to three or four years.
Here is an easy step-by-step guide to sealing from Decks.com:
- Check the weather to be sure you’ll have temperatures between 10° and 32°C. This temperature range ensures the best seal.
- Clean off the deck surface — both furnishings and debris. Be sure to remove any mildew or mould.
- Sand, if needed. Sanding helps ensure the sealer adequately penetrates the timber. Be sure to clean off any sawdust, even between the cracks.
- Stir the sealer. Please do not shake it, as that may cause bubbles in the finish.
- Apply the sealer with a paintbrush, paint roller, or sprayer. Apply a thin coat over a two-to-three-board section. You can always add another thin coat later as it will apply and dry better than one thick coat.
- Repeat and fine-tune.
- Let it dry. Make sure the deck is completely dry before moving back the furnishings.
Flashing
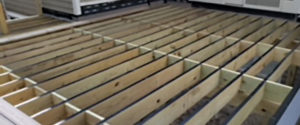
 Trex Protect fights rot where you may not see it. This non-skid, self-adhesive deck flashing tape shields the tops of joists, rim joists, bearers, and the ledger board from moisture, leading to the development of rot and timber decay and the loosening of deck screws and fasteners.
High-quality Trex Protect guards against costly future water damage — at a low cost. For an average size deck measuring 3.6m x 7.3m, five rolls of Trex Protect Joist Tape and one roll of Trex Protect Bearer Tape will be all you need.
So for less than a $130 investment, the deck substructure can last as long as the decking material it supports. To find out exactly how much Trex Protect Joist, Bearer and Rim Tape your project requires, use our Materials Estimator.
Along with bearers and joists, be sure to protect your ledger board. Easy-to-install, self-adhesive Trex RainEscape Wall Flash seals the space between your house and ledger board to keep water out. Wall flash is best used during the construction of a new deck and is another small investment with big returns. Trex RainEscape Wall Flash comes with a 25-year warranty from Trex, the world’s #1 composite deck brand. See how Trex RainEscape Wall Flash protects in this video.
Dealing with Drainage
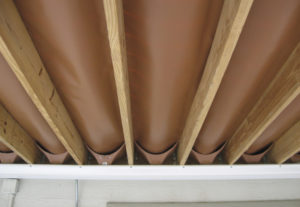
 If you have a second-story deck, you can also install a deck drainage system to divert water away from the joists and bearers. There are essentially two choices: over-joist or under-joist. An over-joist system is just that: the drainage system installed over the joists never allows water to come in contact with the joists. An under-joist system allows water to trickle through the slats in your decking, run over the joists, and collect in the drainage system beneath.
Below-joist drainage systems cause damage and timber rot in three ways:
- First, they allow the timber to get wet repeatedly as rain drips through the deck boards, over the joists, and into the drainage system below. The water hits the pan and runs out, but not before drenching the joists.
- Second, this type of system can trap moisture. If a ceiling is installed beneath the deck, there’s no air coming in to dry out the timber. The only ventilation is through the 6 mm or less spaces between the top boards.
- Third, in the hot months of summer, the temperature further cooks this trapped, wet timber and accelerates the rotting. Over time, this is the perfect formula for timber rot: moisture + heat – ventilation = destruction.
Watch this video to see what happens to timber with under-joist drainage systems.
The best deck drainage systems are installed above the joists. This type of system provides 100% protection of all the joists and bearers from moisture penetration. This type of system also helps to hold the screws in place longer.
For the DIY builder, be sure to choose an over-the-joist system that’s easy to install. Use this handy chart for comparison. As you’ll see, Trex RainEscape offers high-quality and easy installation.
Some companies sell waterproof membranes or decking systems designed to apply over decks. These deck membranes are meant to keep the area below the deck dry. However, this may not create a waterproof dry space below the deck without proper downspouts and flashing.
When considering deck waterproofing systems and solutions, the best rule is rain, rain, keep away! To ensure your outdoor living space is safe and comfortable, don’t skip the process of creating waterproof decking. Take care of your deck so it can take care of you.