How to Build a Ground-Level Deck
By Dave Kile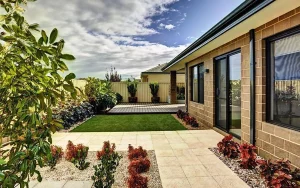 I love ground-level decks: they’re easy to build, make a big impact on outdoor living, and fit almost any backyard. Set low to the ground, often under 30 cm high, these decks typically don’t require stairs or railings, making them simpler, DIY-friendly, and more affordable.
However, because they sit so close to the ground, these decks come with a few special considerations, including structural differences, moisture concerns, and termite control. In this guide, I’ll walk you through what you’ll need, step-by-step construction, common mistakes to avoid, and how to keep your ground-level deck in good shape for years to come.
Tools and Materials Needed
Here are the basics you’ll need for your ground-level deck project:
- Tape measure, level, string line
- Circular saw, drill/driver, impact driver
- Shovel and rake (for site prep)
- Weed mat and gravel for drainage
- H3 or H4 treated pine joists rated for ground contact (resists decay and termites)
- Decking boards (timber or composite)
- Structural screws and brackets/anchors (for the frame)
- Decking screws or hidden fasteners/clips (for the boards)
- Joist hangers (if attaching to a ledger)
- Trex Protect Joist, Bearer & Rim Tape to shield framing from moisture
- Trex Seal Ledger Tape if your deck will attach to the house
- Gloves, goggles, and hearing protection
If you’re building in a bushfire zone, check local requirements for decking materials. In BAL-rated areas, you may need fire-resistant species or composites that meet specific standards.
Step-by-Step Guide: How to Build a Ground-Level Deck
I’ve built plenty of ground-level decks, and I can confidently say they’re the most approachable type of deck to tackle as a DIY project. Check out my steps below, and you’ll see how achievable it is to build one yourself.
Planning
Start by deciding on the basics: how big your deck will be, whether it’s attached to the house or freestanding, and the orientation that best suits your space. Factor in sunlight exposure and shade considerations. Once you have the concept in mind, sketch it on paper or lay it out using an online design tool. It’s still helpful to physically mark out the area on site with string lines and stakes to better understand the footprint and confirm that there will be an adequate deck area for the uses you’re planning. It’s best to clear the area first so your string lines can stay in place for the site preparation step.
Next, check your local requirements. Most ground-level projects do not require approval; however, rules vary by state and council, so it is always best to confirm before building a deck. Factors such as a larger footprint, building in a bushfire-prone area, or attaching your deck to the house may trigger additional approval requirements, even if the deck is low.
Site Preparation
Clear vegetation and mark out the area with string lines. Double-check that your layout is square by measuring diagonally from corner to corner until both measurements match.
Level the ground but provide a slight slope, even if your deck will be freestanding, so water has somewhere to go. If the deck is attached to a house, slope it away from the house. Then, I like to lay down a weed mat and cover it with gravel. Doing so will keep the soil covered, improve drainage, and leave the area open for termite inspection without hidden entry points.
Support Placement
Plan to set your frame on concrete pads, deck blocks, or pavers rather than directly on the gravel or soil to create stability. Additionally, leave clearance beneath the deck to allow air to circulate. Even 100 to 150 mm makes a big difference by providing better ventilation and preventing trapped moisture, which in turn makes your deck less appealing to termites.
You’ll want to space your joists 400 mm on centre for composite decking, or 450 mm on centre for timber boards, with the joists running perpendicular to the decking. If you plan to lay the decking on a diagonal, run your joists straight but reduce spacing to about 300 mm for composites or 350 mm for timber.
Lay out a support grid beneath the joists so each is supported every 1.2–1.5 metres along its length (check span tables for your joist size and species). Mark the support points on the ground.
Excavate shallow recesses at the marks. Compact the ground if needed and add gravel for stability. Position your pads, blocks, or pavers evenly across the grid, checking with a level and adjusting until they sit solid and flat.
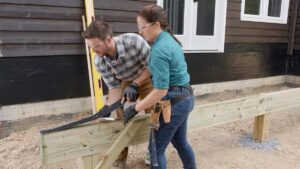
Frame Construction
With the supports in place, you’re ready to build the frame. Choose termite-resistant, H3 or H4 treated pine rated for ground contact for your framing timber.
If your deck attaches to the house, install a ledger board first. Protect it with Trex Seal Ledger & Sub-Ledger Tape to create a waterproof barrier where the deck meets the home. Make sure you don’t bridge or cover existing termite barriers, and keep inspection zones visible. Secure the joists to the ledger with joist hangers.
Once done, or if your deck is freestanding, lay your joists across the supports. For precast deck blocks with slots, the joists are positioned and held in place by the weight of the finished deck and the perimeter frame. If you have concrete pads, use anchors or brackets to secure the timber so it can’t shift.
Install rim joists around the perimeter of the deck frame, fastening them to the ends of the interior joists and to each other at the corners with structural screws. Together they form a rigid rectangle that holds your frame in place. Check diagonal measurements and use a level to confirm the frame is square prior to fixing everything firmly in place.
Before the decking goes on, apply Trex Protect Tape to the tops of all your joists. This self-adhesive butyl tape seals around fasteners and helps prevent moisture from penetrating the joists, extending the life of your frame.
Installing Deck Boards
Select decking boards made from treated pine, durable hardwood, or composite materials. For timber, use treated options or naturally durable species suited to ground-level conditions and resistant to termites.
Start by setting your first board on top of the joists along the house wall, or along a straight reference line if your deck is freestanding. I always stress the importance of taking the time to get this starter board perfectly straight and square, because it sets the standard for the rest of your deck.
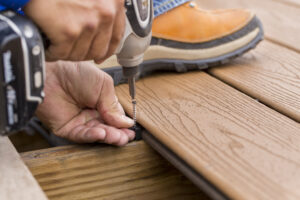 Lay subsequent boards with consistent 3–5 mm gaps for drainage and expansion, using spacers as needed. If you’re using composite boards, follow the manufacturer’s guidance for gapping. Secure your decking with hidden fasteners for a clean, fastener-free surface or face-screw the boards with pre-drilled holes at each joist intersection. As you work across the frame, check that alignment and gaps remain even.
Once you finish installing the field boards, add a picture-frame border for a clean finish, or continue your decking to the rim and trim the ends flush.
Finishing Touches
Install fascia boards to conceal the frame. I recommend using thin spacers behind the fascia at screw points so the boards sit a couple of millimetres off the rim joists. This consistent spacing gives a neat finish while still allowing airflow to dry the deck out and help prevent rot, mould, and insects.
Adding Low built-in seating or planter boxes can also provide function and style.
How Much Does It Cost to Build a Ground-Level Deck?
Ground-level decks are typically more affordable than raised ones, but costs vary by material:
- Timber (DIY): $300–$600 per m²
- Timber (professional; installation): $500–$1,000+ per m²
- Composite (boards only, DIY): $100–$350+ per m²
- Composite (professional; installation): $800–$1,200 per m²
For a detailed breakdown, see our deck cost guide.
Common Mistakes to Avoid
Over the years, I’ve seen some of the same errors crop up time and time again. Here are the top mistakes to avoid on your ground-level deck:
- Skipping permits: This can lead to costly rework if your council requires approval.
- Poor drainage: Water pools under the deck, leading to dampness and decay.
- Inadequate airflow clearance: Stagnant air accelerates mould and termite risk.
- Forgetting frame protection: Exposed framing rots quickly in wet, humid conditions.
- Incorrect board spacing: Traps water and causes cupping or warping.
Maintenance Tips
Routine care will keep your ground-level deck looking good and standing strong:
- Seal cut ends of timber boards during installation and reapply as needed to keep moisture out.
- Sweep debris from gaps to keep airflow open.
- Wash down boards seasonally with soapy water.
- Reseal timber boards every 1–2 years.
- Inspect annually for loose fasteners or signs of rot.
- Inspect your property annually for termites and keep the inspection zones around the perimeter clear so that any activity is visible.
Conclusion
A ground-level deck is one of the easiest ways to upgrade your backyard, offering comfort, style, and function without complex construction. With thoughtful planning and protection from Trex Protect and Trex Seal, it’s a project you can take on with confidence—and one that delivers a big payoff in how you enjoy your outdoor space.
Sources
ABCB. (2023). NCC 2022 Volume Two – Housing Provisions.
Bunnings Workshop. (n.d.). How to build a low-level deck.
This Old House. (2024, September 9). How to build a simple deck.